
A is for Apron
Hi there friends! It's a fresh new week ready for us to get out and conquer it. Yay. We had a lovely rainy weekend....still in the mid 60s so I could have all the windows open and get all the fresh air. I love the gloomy rainy days so much. There's something so cozy about it, and of course now that they're so few and far between I need to cherish each one!
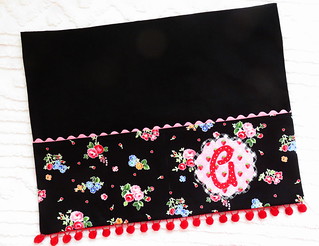
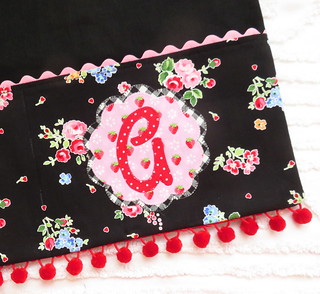
Last week you had a glimpse of the applique I started for this little work apron. I started out making the pocket ( (2) 7 1/2" x 21 1/2" rectangles). The inside of the pocket has fusible interfacing .. just whatever I had laying around, I'm not an interfacing genius at all. I appliqued my little monogram onto the outside pocket, then stitched the pocket lining (same fabric) along the top with some rick rack for a nice break between the black floral and the Black Essex linen I used on the body of the apron. This is the first time I've used the Essex Linen and it's quite nice, just the kind of body you need in an apron.
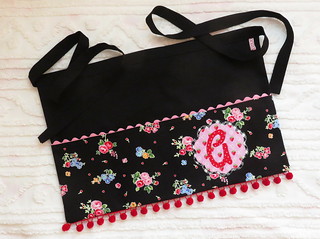
I ended up cutting my apron body (2) at 21 1/2" by 13 1/2". Originally I went a little taller but I didn't like the proportions. I basted the pocket to the apron body front, and then layered the back apron piece rights sides together and sewed around the sides and bottom, leaving the top open. I added some pom poms on the bottom for fun. I like the red and pink thing I have going here. You flip that right side out and press. Now's the time to measure off some pocket divisions and stitch from the pocket edge to the bottom of the apron. I just picked some arbitrary sizes.. you can too! Then I cut (2) strips of the linen 4 x wof, cut one in half at the fold and sewed it to the other piece at each end, so you have one long piece of fabric. (and seams that don't fall right in the center) Fold in half lengthwise and press to form a crease, then bring the long edges to the center and press, then fold on first crease to create a 1" tie that is open along the long edge. Fold the ends in 1/4 inch so there's no raw edges showing. I found the middle of that tie and matched it with the middle of the apron and slid the apron into the tie till it met the crease. I pinned the heck out of it and then starting at one end of the tie I topstitched will I got to the other end lengthening my stitch a bit.
Press it and you're done! There's lots of ways to handle each and every step but that's how I did it. Now you too can make a cute apron and you have the dimensions that worked out for me as a starting point. Want more instruction? The Spring 2014 Quilts and More has an adorable apron and you can download that issue here if you don't have it stashed!
Ok peoples that's it for me today! Hope you have a great week! xo
posted by PamKittyMorning at 5:30 AM
![]()
![]()


.jpg)


5 Comments:
So cute Pam! I am itching to get back to my sewing room. Today is last day of our road trip...a long, long drive home from Winslow but who wants to stop in Barstow!
Love seeing what you used your sweet little applique on. That's going to make a great gift. Thanks for giving us all your measurements. I have made a couple of work aprons for friends, but didn't write down what I did. Your PK fabric and all your little embellishments are perfect.
Adorable little apron! I love florals on black backgrounds and this looks so pretty especially with the added ric rac and pom pom trim.
Helen xox
Very sweet! I wear aprons all the time. I especially like them in my sewing room to collect stray threads as well as pockets for tools and phone.
Very sweet! I wear aprons all the time. I especially like them in my sewing room to collect stray threads as well as pockets for tools and phone.
Post a Comment
<< Home